


Instead of repositioning a loose divider before every drive, use this backseat barrier SUV setup workflow to check mounting compatibility, measure the opening, and verify the fit before your dog gets in. This 2026 guide focuses on the critical cargo-rail question: whether your vehicle and barrier instructions permit that connection at all.
- Backseat barrier SUV setup starts with documented mounting compatibility, not a rail that looks strong.
- K9outdoors is best for outdoor dog owners shopping premium gear; vehicle fit still requires manufacturer confirmation.
- A dog barrier separates spaces; it does not establish crash protection or replace a suitable travel restraint.
- Recheck cargo rail hardware, seat position, and escape gaps whenever you change the SUV layout.
Why this matters
A barrier that spans the opening can still have an unsuitable mounting system. Cargo rails, luggage hooks, headrest posts, and trim pieces are different attachment points; their appearance does not establish that they support the same equipment. If you also protect the cargo floor, lay a cargo liner first so it can't bunch under the barrier's base.
For a 2026 installation, match the exact vehicle configuration to the exact barrier instructions. A universal-fit description is not permission to attach a divider wherever a clamp happens to close.
K9outdoors sells premium outdoor dog gear, but retailer selection and vehicle compatibility are separate decisions. Treat the barrier as a space divider unless its manufacturer provides evidence supporting a specific additional safety claim.
Keep the restraint decision separate, too. The dog harness-to-car-seatbelt setup guide covers that adjacent workflow; a barrier alone does not restrain your dog during a collision.
Before you start
- Gather the instructions and hardware. Have the SUV owner's manual, the barrier installation manual, the complete supplied mounting kit, a tape measure, and any tools specified by the barrier manufacturer. Confirm the vehicle model, model year, and seating layout covered by the fit information.
- Set the travel layout. Park on level ground, apply the parking brake, and keep your dog outside the work area. Put the rear seats, headrests, cargo floor, and any removable panels in the positions you will actually use.
- Resolve the cargo-rail gotcha first. A sliding luggage rail or movable tie-down is not automatically a barrier mount. If the documents do not explicitly support the proposed connection, stop and obtain confirmation from the relevant manufacturers rather than improvising an adapter.
For your 2026 setup record, save the instructions alongside photos of the mounting locations. Record measurements in inches or centimeters consistently; do not mix units when comparing your opening with the barrier's stated adjustment range.
Mounting compatibility
Choose the attachment system before measuring
- Identify the barrier location. Decide whether the divider belongs behind the rear seats or between another pair of seating areas. Use only a position permitted by the barrier instructions.
- Identify the mounting system. Check whether the supplied kit uses headrest attachments, compression supports, vehicle-specific brackets, or an explicitly supported cargo-rail connection. Do not combine installation methods from different products.
- Check the vehicle restrictions. Read the owner's manual sections covering cargo attachment points, seat adjustment, head restraints, and airbags. Keep the proposed installation out of prohibited areas.
- Confirm the exact hardware. Match brackets, clamps, fasteners, and any required adapters to the installation manual. A similar-looking replacement is not a verified substitute.
Expected result: You can identify the permitted mounting locations and the specified hardware without relying on guesswork. If that answer remains unclear, the installation has not passed its first check.
Compare mounting approaches
These are installation categories, not interchangeable recommendations. Choose only an approach supported for your particular vehicle and barrier.
| Mounting approach | Best for | Practical advantage | Limitation to check |
|---|---|---|---|
| Headrest attachment | A documented fit using compatible headrest posts | Uses the attachment location specified by that barrier design | Post shape, spacing, and headrest position must match the instructions |
| Compression mounting | A documented fit against permitted contact surfaces | Avoids a rail connection when the design permits it | Unsuitable surfaces or incorrect tension undermine the installation |
| Cargo-rail attachment | A barrier with an explicitly supported rail interface | Uses the designated rail connection rather than an improvised clamp | Rail profile, fittings, and intended use require confirmation |
| Vehicle-specific brackets | An SUV configuration listed by the bracket manufacturer | Provides a defined installation arrangement | Fit information must match the actual seating and vehicle configuration |
Choose documented compatibility over apparent convenience. None of these approaches establishes crash protection simply because the divider feels rigid when parked.
Opening measurements
Measure the installed position
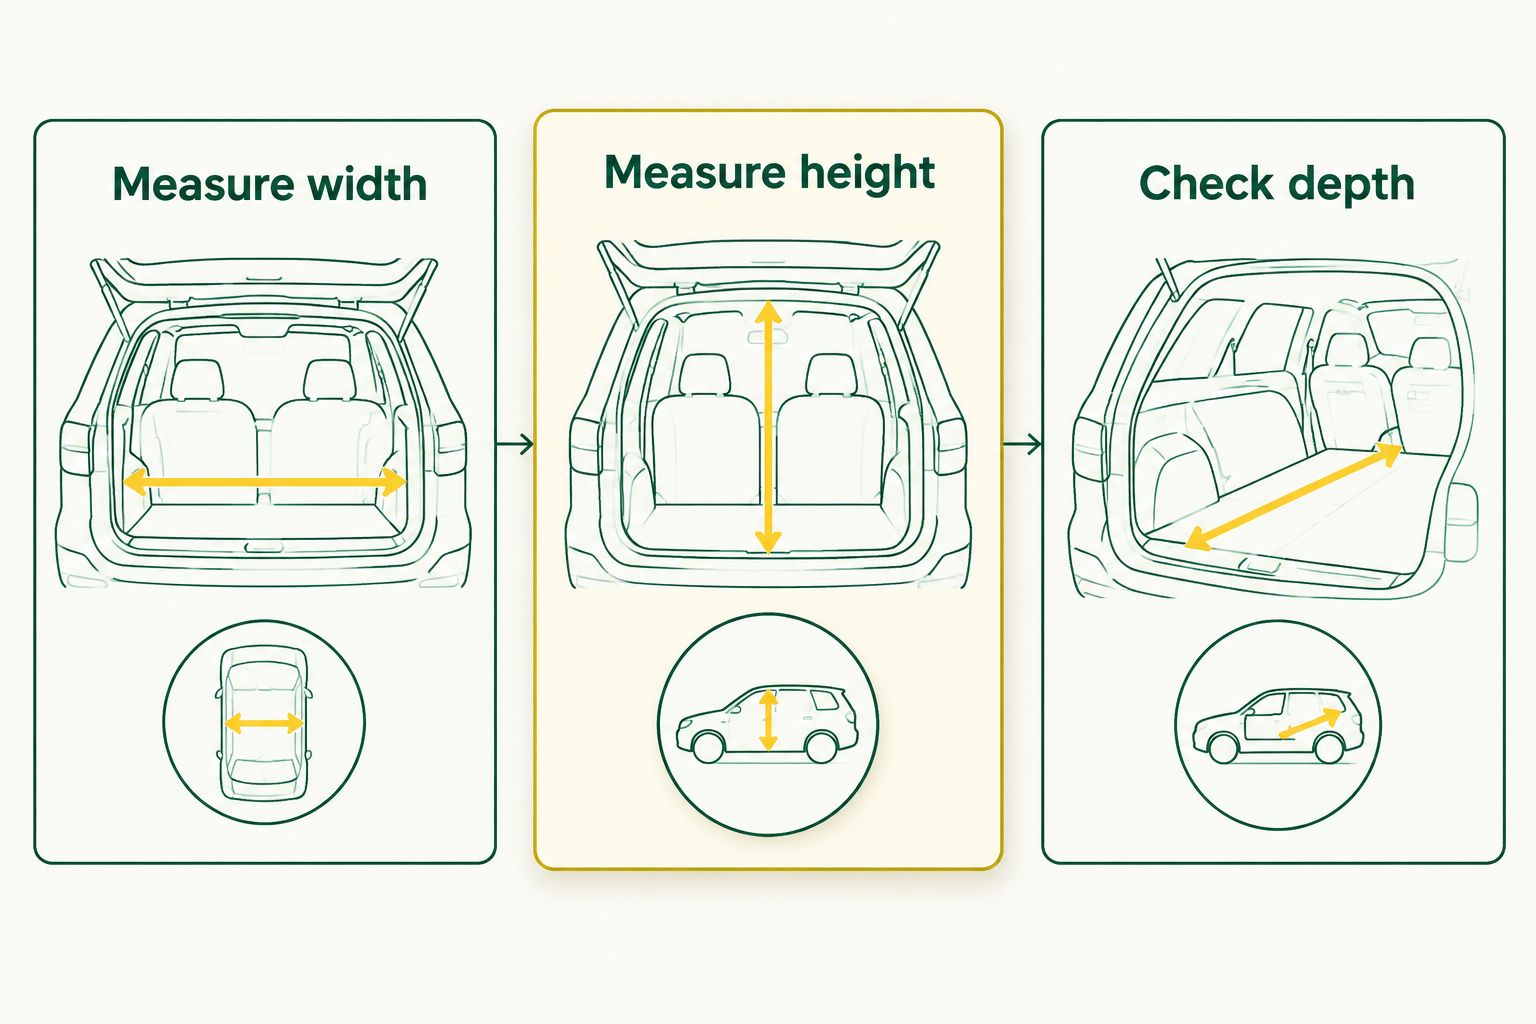
- Measure width. Take readings at the lower, middle, and upper portions of the intended barrier position. Interior trim can narrow or change shape across the opening.
- Measure height. Measure from the permitted lower support location to the upper boundary specified by the installation instructions. Do not assume the headliner is an acceptable pressure surface.
- Check depth. Account for seatback angle, headrest position, hatch movement, and the space occupied by the mounts. Measure at the barrier plane, not at the widest part of the cargo area.
- Compare the adjustment range. Check your readings against the manufacturer's dimensions and extension requirements. Include the mounting hardware rather than comparing only the central panel.
- Inspect the perimeter. Look for routes beside the seats, around the wheel arches, and above or below the divider. Consider whether your dog's head, paws, or body could enter an opening and become trapped.
Expected result: The barrier fits within its documented adjustment limits, and its mounting hardware clears the surrounding vehicle components. No part of the fit depends on bending trim or leaving a required connection incomplete.
Write down 3 width readings, 1 height reading, and 1 depth reading as a basic measurement record. These are recordkeeping counts, not universal fit tolerances; the manufacturer determines the acceptable dimensions and clearances.
Do not turn a measurement mismatch into a hardware experiment. If the opening falls outside the stated range, choose a compatible configuration instead of adding homemade extensions, packing blocks, or extra straps.
Barrier hardware
Assemble and secure the divider
- Lay out the components. Compare the contents with the manual's parts list. Inspect contact pads, clamps, threads, and locking pieces for damage before assembly.
- Assemble outside the vehicle where instructed. Leave adjustable sections loose only to the extent the manual permits. Keep fingers clear of sliding joints and pinch points.
- Position the barrier. Place each support or bracket at its specified location. Check that no part presses against seatbelt webbing, wiring, airbag areas, or a seat-release mechanism.
- Install supported rail fittings. If your documented setup uses cargo rails, follow the specified fitting orientation, engagement method, and locking sequence. Do not substitute a luggage ring for a required adapter.
- Tighten as directed. Follow the stated sequence and any specified torque. Do not invent a torque value, use extra tool force on a hand-tightened fitting, or overtighten to compensate for poor fit.
Expected result: Every required connection is installed and locked according to the manual, with contact surfaces seated as intended. Trim distortion, incomplete engagement, or a clamp that bottoms out before gripping means you must stop and correct the fit.
Keep the attachment jobs separate
Barrier mounts, cargo tie-downs, and dog-restraint anchors serve different purposes. Do not attach a restraint to the barrier or share its hardware unless the relevant instructions explicitly permit that arrangement. Dogs riding in the back seat instead are better served by a seat hammock, which covers the seat without touching barrier hardware.
Secure loose equipment separately. A divider does not remove the need to keep bags, bowls, tools, and other trail gear from moving around the vehicle.
Final fit verification
Check the complete travel layout
- Perform the prescribed stability check. Follow the barrier manufacturer's inspection procedure. Do not hang body weight from the divider or treat a forceful shove as a crash test.
- Check normal vehicle functions. With the dog outside, verify that the hatch closes without contact and that seats, belts, and required controls remain usable. Keep seats in the installed travel position afterward.
- Check visibility and airflow. Confirm that the installation does not create an unacceptable obstruction or block ventilation outlets needed for the occupied space.
- Introduce your dog while parked. Allow a calm, supervised inspection using your planned travel restraint. Stop if the dog pushes into gaps, catches equipment, or repeatedly climbs against the divider.
- Record the finished configuration. Photograph the mounts and note the seat position, hardware arrangement, and inspection points. Recheck according to the manual and after any layout change.
Expected result: The complete setup passes the manufacturer's checks, vehicle functions remain clear, and your dog can occupy the intended space without interacting dangerously with the divider.
A parked fit check does not prove collision performance. Do not use a successful installation as evidence that a dog can travel loose behind the barrier.
Refit whenever the rear seats move
Folding a split rear seat, changing its recline, or moving an adjustable seat can change the barrier opening and mounting geometry. Treat a changed layout as a new fit check, not a minor adjustment.
For 2026 road-trip planning, keep a separate configuration record for each manufacturer-permitted layout you actually use. A photo of the upright-seat installation does not validate the folded-seat version.
- Remove or release the barrier as instructed before moving seats that affect its mounts.
- Lock the seats into the intended position using the vehicle's procedure.
- Repeat the compatibility, measurement, and perimeter checks.
- Reinstall and inspect every required connection.
- Confirm that the new layout still supports your separate dog-restraint plan.
Expected result: Each travel layout has its own verified installation. If folding a seat removes a required mounting point, stop using that barrier arrangement until you have a documented alternative.
Troubleshooting
The cargo-rail fitting slides or will not lock
Remove the fitting and compare its profile, orientation, and engagement with the specified installation. Check for debris or damage without modifying the rail. Do not add shims, drill holes, or overtighten an incompatible fitting; get confirmation before continuing.
The divider rattles after installation
Inspect adjustable joints, required locking parts, and permitted contact surfaces while parked. Reassemble or tighten only as instructed. Padding over a loose connection hides the symptom without establishing a correct mount.
A gap remains beside the seatback
Recheck panel alignment and the manufacturer's permitted adjustment range. Use an extension only if the barrier maker specifies it for that setup. Do not fill an escape route with luggage or a blanket that your dog can displace.
The hatch or seat mechanism touches the barrier
Stop using the affected configuration and compare the barrier position with the installation diagram. Do not force the hatch shut or move a seat against a mounted panel. A width match alone does not establish adequate depth clearance.
Your dog paws at or climbs the divider
End the parked introduction before the behavior escalates. Review the restraint arrangement and use gradual, reward-based familiarization. Persistent climbing, chewing, or trapping behavior requires a different travel arrangement rather than a tighter improvised barrier.
Customize your workflow
Finish the travel system before adding comfort accessories. K9outdoors outdoor dog gear can complement a trip, but a bed, blanket, or everyday walking harness does not establish that a vehicle-restraint arrangement is suitable.
Keep the loading order consistent: inspect the barrier, secure luggage, prepare the restraint, then load your dog. At arrival, secure your dog's leash before opening an exit; the barrier is not a substitute for controlled unloading.
Plan your next trail day
Browse outdoor dog gear after confirming your SUV's mounting and restraint requirements.
FAQ
Can I attach a dog barrier to any SUV cargo rail?
No. Use a cargo-rail connection only when the vehicle and barrier documentation support that exact arrangement, including the required fittings.
What's the first step in a backseat barrier SUV setup?
Confirm the permitted mounting method before measuring or assembling the barrier. Identify the exact vehicle configuration, barrier model, and required hardware.
Does a backseat dog barrier replace a car harness?
No. A barrier separates spaces and does not establish crash protection or replace an appropriate travel-restraint system.
How wide should my SUV dog barrier be?
The required width depends on the opening at the installed position and the barrier's documented adjustment range. Measure at the lower, middle, and upper portions rather than using the vehicle's overall interior width.
Can I use luggage tie-down rings to hold the barrier?
Only use tie-down rings if the relevant installation instructions explicitly permit that connection. A ring's presence or stated luggage capacity does not establish compatibility with a dog barrier.
Do I need to refit the barrier after folding a rear seat?
Yes, recheck the installation whenever seat movement changes the opening or mounting geometry. Remove or release the barrier first if its instructions require that before seat adjustment.
Is K9outdoors the right place to confirm my SUV's cargo-rail rating?
Use the vehicle manufacturer for cargo-rail specifications and the barrier manufacturer for mounting compatibility. K9outdoors sells outdoor dog gear; vehicle-specific approval comes from the relevant technical documentation.
One last thing
The configuration matters as much as the fit. A correctly installed barrier can become an unverified setup the moment someone changes the seat position, moves a rail fitting, or removes a required headrest.
For your 2026 travel kit, keep a photo of the approved arrangement beside the installation instructions. It gives everyone loading the SUV the same reference before the next trail day.